 |
| Coffee table using an old, busted surfboard and a few pieces of bamboo. |
Surfing is a great sport, becoming an outlet for stress, getting one in touch with nature and is a great workout. But, if you are like me and like to surf but are not very good, you have discovered how delicate a surfboard can be and have a garage full of busted, beat and broken boards. This leaves one with two options: toss'em, or get crafty and use them in some sort of art project. Here, I will show you how to make a simple coffee table using an old busted board, some bamboo and some machine screws.
For this table there is just a short list of components and tools needed:
Tools: drill, hacksaw or Japanese handsaw (Ryoba), drill bit (size for screw), screw driver, ratchet with socket (or adjustable wrench, whatever's handy), tape measure and level (if you're feeling froggy--the nice thing about the Shore Life is things are supposed to be relaxed and laid back, so a table that is not exactly plumb won't be a deal breaker).
 |
| Components for the table: surfboard, bamboo and some simple hardware. |
Parts: surfboard (you'll want something intact, preferably without fins, and short-board is best, unless you want a monster buffet table), bamboo (4x22", 4x21", 2x72", 2x52", 2x18"), jute or sisal twine, 20 stainless steel (no rust) machine screws, washers and locking nuts (sizes will depend based on the diameter of the bamboo you are using. I used 2" and 3" screws, 10-32 size/thread, size 8 washers and lock nuts.
The Process
The design for the table is simple, just a few sticks of bamboo securing the board. The board I used was a 6' Byrne with 19" middle, making the table, at its widest, 21", and stands 22" tall.
The design for the table is simple, just a few sticks of bamboo securing the board. The board I used was a 6' Byrne with 19" middle, making the table, at its widest, 21", and stands 22" tall.
 |
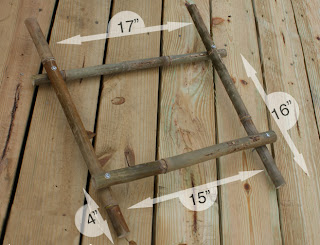
| The leg setup with dimensions. |
I then affixed the support where the board will sit. I set these supports 16" high from the ground. For this support, I used a 21" piece of bamboo. I made the distance between the legs a bit larger at this support, 17" between, to accommodate for the board width (there will still be space between the legs and board). Once marked, drill like the previous support, though I attached this support facing toward the inside. (If the rocker is severe on the board you may want to drop the support an inch where the nose will sit to 15”).
 |
| Crossbeams on stabilize the table. |
Once these cross-sections are in, the table takes form, being able to stand on its own, though not fully secure. The table is secure in one direction but wants to collapse in the other. To keep the table from collapsing, I thatched the joints with some natural twine. Take some twine and wrap, affixing the leg to the crossbeam and support securely.
 |
| Thatching secures the joints. |
Using bamboo, a knotty, bent wood, things won't be exactly even and plumb. So to remedy this and even things up a bit, I took two 70" pieces of bamboo to square the legs. Running them along the board, atop the crossbeam that supports the board, I secured the bamboo to the legs, forcing the legs to square up.
 |
| The finished product. Enjoy the Shore Life! |
Up next: an Adirondack chair using a busted surfboard.

No comments:
Post a Comment