Wednesday, March 28, 2012

DIY Retro Twin Fin, Part 3: Rails & Tail

Special care should be taken with the nose and tail. For the most part these sections are much thinner and will break with a heavy hand. I took about a ¼-inch of foam off the thickness at the middle of the board but more than an inch at the nose, leaving it only a ¼ inch thick at the very tip, so sanding took some time. I planed the stringer down first, taking care not to snap off the end, then sanded down the foam using uniform perpendicular strokes from rail to rail, leaving a nice smooth, lightly curved surface.


When it came to the tail, I cut a deep 6-inch swallow tail. I planed the tail down to about an inch thick, tapering down to a blunt point at the end, and hand-shaped the rails on the inside of the tail. I kept the rails pretty routine, rounding the top but leaving a pretty hard edge on the bottom. I carried the overall curvature of the tail from rail to rail, almost giving it a domed shape.
Working the rails.

Once I was at a comfortable spot on shaping, leaving still a bit to go, I cut the rails with the Fred Tool. The Fred Tool is essentially a block of wood with a 30-degree blade off one side. I determined how deep I wanted the rails to come—roughly an inch and a half on the top. Marking small pencil marks along the board every six-inches or so. I then took the Fred and ran it along the board, cutting to those points. I then flipped the board and marked about an inch in from the edge, tapering off about two-feet shy of the tail. I then ran the Fred, cutting to the pencil marks. Once the rails were cut, leaving a triangular/trapezoidal shape, I began rounding the rails by hand with some 120-grit sandpaper, tri-folded. Walking nose to tail with long continuous strokes, I gently shaped the rails, following the contour of the board, making sure to only round the top of the rail of the last two-feet, hardening and flattening the bottom.


Even with a light touch, there will be some wonky spots along the rails. To correct, a long block sander with flex is key. This will span the dips and smooth everything flush while following the general curve of the rail. The rails are one of the most difficult parts to shape, especially for first timers. A simple tip is to count out the strokes when sanding—sand ten times, flip, sand ten-times. It is not perfect, but it will help keep the rails symmetrical. And if one were so inclined, a simple sharpie line the length of the rail—dead in the middle—if done smoothly, can be quite helpful, showing the dips and imperfections. Smooth out and lightly sand away the line.
Finding imperfections under light.

When the board looks good to glass, it probably isn't. A good way to find the imperfections and hollow spots is place the board over some lights shining upward. Bring the board inside on a rack, then set some fluorescent lights below, just a few inches below the board, along the rails. Step back and get low, equal with the board and it is pretty easy to see all the imperfections. Mark them with pencil, flip and repeat. Sand and shape, throw back on the rack and flip the lights. Repeat as needed.


For some hollows, simply running a hand along the board is all it takes to find the spots. It helps to feel the board without looking, using just the sense of touch.


Sanding the channel.
Also, a second or third pair of eyes would not hurt either. It takes some time to notice the imperfections put into the board by your own hand, and it can be a bit of an ego blow when someone points something out immediately, but in the long run it is worth the minor embarrassment. So don't get defensive!


As I mentioned in an earlier post, I added a groove underneath to try and channel water for added propulsion and stability. I sanded on both sides of the stringer until I got to a decent depth, about a half an inch, and feathered it out toward the rails. I ran this channel about two-feet up, tapering to even (essentially like a half cone, flattened). I used the Surform Pocket Plane to bring down the stringer, and cleaned everything up with some 220-grit sandpaper.


Once the board has been shaped, run a level perpendicular with the stringer in places where it is intended to be flat. Smooth any dips found by lightly sanding with a block. In spots where more blending needs to be done, especially on the deck and the bottom, do so with a longer block sander that has some flex. When it comes to rails and tail, do so by hand with an extremely light touch—try to let the natural curve of the board works its way out. The tail was particularly difficult for me, taking off more on one side, then the next. I remedied this with the florescent light, then hand sanded until the tail was uniform, touching up with the large block sander.
Working the tail on the twin fin.


In the end, when it comes to shaping there is not much technique involved other than be conservative when eating into the foam and be mindful of the next step, it will help keep from whittling the board down to a tooth pick. And take your time. The smoother and cleaner the shape pre-glassing, the easier it will be to glass later, and the better it will ride in the surf. Remember, it's all about the ride, enjoy the Shore Life!

Tuesday, March 20, 2012

DIY Retro Twin Fin Surfboard, Part 2: Tools & Shaping

Once the design of the board has been decided, it is time to shape. When researching how to make a board the majority of the stuff I read said use a template, then conveniently posted a place to buy said template.
traced-out-blank
Tracing out the retro twin fin.

Well, I saved a few bones and went free hand, marking measurements off the stringer every six inches the entire length of the board, both sides, to give the design some symmetry. The shape, as I mentioned in a previous post, is retro twin fin, with a quasi longboard nose (rounded with a bit of a point), tapers in the tail, with a channel running along the bottom. Lightly drawing by hand with a pencil, I ran a line along one side of the board to a predetermined point measured from the stringer. Once the line was correct, I measured every six-inches and mapped them out on the other side. Then I took a Staedtler 24-inch Flexible Curve ruler and bent it to match the drawn line. Using the curve of the ruler, I traced it out along the other side with the mapped out measurements, finishing the nose. I repeated this the length of the board, making it as symmetrical as possible before cutting the board. Once the board is traced out, look at it, envision it cut, shaped and ready to ride. If its off, tweak until it is perfect. But remember, this foam is incredibly soft and easy to take off more than expected. So for the first time board maker, I suggest giving an extra inch to the overall width (half inch all the way around), there will be an inevitable mistake or two, so that extra foam will help when shaving down the blank to make it uniform.
cutting-board
Cutting out the retro twin fi


Using a jigsaw, I cut out the board. When cutting the blank, maintain a 90-degree angle with the blade in relation to the blank, this will help maintain the dimensions originally traced out. The rest of the shaping process was all through hand-tools and good old elbow grease.
There are two trains of thought on shaping: electric and hand-powered. Most pros go power because, well, they are pros. Using power planes, power sanders and routers is great, but most people do not have these tools. And for a first foray into building a board, I would shy away from the power tools; the power planer will eat through the foam in the blink of an eye, and a random orbital sander will put 'smiles' throughout the blank, requiring hand sanding to even everything out while reducing overall foam volume (i.e. floatation). The board will be ruined well before it is glassed.


Surf stands are a key part when making a custom board. I would suggest making a set before undertaking the project. For this first board, I had some padded stands used for boats, but for next project, a set of stands will be the first on the 'to do' list.


Going sans electric (minus the jigsaw and a few steps down the line), I used the whole portfolio of Stanley Surform hand tools, a 6 ½-inch block plane, a Fred Tool for the rails, block sander (hand sized and a flexible custom 22”x3 ½” closed-cell foam ditty I put together), and sandpaper [80, 120 and 220 grit].

hand-tools
Hand tools of the trade.


Shaping is tedious but essential to the overall performance of the board, so take ample time and maintain a close eye to detail; and remember, symmetry is key to a smooth riding board! I started with planing down the stringer, then sanding my way to the rails. I suggest a lengthier block sander, the smaller ones will put dips all over the foam, while the longer ones tend to follow the line and give a smoother, cleaner finish. Sand with complete tail to nose strokes, parallel to the stringer but stop sanding at the nose curve (about 4 ½ feet up from the tail on my board)! It is very easy to gouge into the nose curve, causing a rather unsightly gash and weakening the overall strength of the board. So once the curve has been reached, begin sanding perpendicular to the stringer, gently following the natural curve of the deck of the board. Smooth by hand if needed, but a block should be all that is needed.


Remember, do not to concentrate solely on the deck. Though these preformed blanks come pretty clean, the bottom still need to be fixed up and shaped. Don't take too much off the deck, or it will leave very little room for improvement below.


The bottom is much easier to shape, essentially following the curvature already in place. Take a large block sander and follow the curve smoothly and evenly, with long continuous strokes. When hitting a dip, continue easy strokes and fare it out versus small scrubs, this will only accentuate the problem.

shaping-and-sandign-b4-rails  
Shaping the twin fin. Enjoy the Shore Life!

Monday, March 19, 2012

DIY Retro Twin Fin Surf Board, Part 1: Design

As I have taken to surfing one thing has remained the same, prices on boards never seem to drop. A showroom stick can set you back upwards of a grand now, and they seem be more and more temperamental, with pressure dings and fractures happening appearing under the slightest touch. So I decided to get in touch with my inner 1950s Hawaiian and make my own board.

After reading former Surfer magazine editor Matt Warsaw's magnum opus, The History of Surfing [Chronicle Books], which covered the sport from its humble Polynesian beginnings to the current mass market/sub-culture line it tightropes now, the urge to make my own board set like a hook. It is a practice every surfer should experience at least once. After taking a blank and shaping it into rocket to sling under the arm and sprint down the beach toward the tideline, there is a sense of accomplishment, especially when dropping in on that first wave and pulling it toward the lip; it will be one of the most memorable rides of your life. But first things first, design.

Design

Perhaps the most important step in the entire process, design will dictate what the board is suited for. So there are a few things to take into account: what you surf the most (and have readily available in the quiver—don't want to double up too much); what is your home break like; and what do you think you'll want to surf in the future? Design comes down to the individual, this is, after all, a custom surfboard, so some foresight and time is needed before tracing out the board's shape.
US Blank 6'8" P - Soon to be Retro Twin Fin Surf Board
If you do not take your time on this, no matter how much time and effort you expend on the construction, if the design is off, does not suit your break, or is contrary to your personal surf style and/or physical requirements (too big/small, too much/little foam—too much/not enough buoyancy),all that work is for naught; it doesn’t matter if it is pretty, this is about function.

Living in South Florida, in the shadow of the Bahamas, where a decent swell comes in the dead of our too short winter or with a hurricane, I am mostly surfing small, wind chopped, chunky close-outs. So something that can power through the chop without slowing down is a must, which means when tinkering with design there is only one way to go: only short shorts and floral shirts need apply, I tapped into my inner Magnum P.I. and went with a Retro Twin Fin Fish.

The fish is the perfect design for South Florida. Small and responsive with enough buoyancy to keep the nose above the chop, and quick enough to drop in before the wave closes out leaving you with nothing but class four rapids. Using an US Blanks (made in the USA baby!) measuring at 6'8”P, 21 1/2” wide, I chopped the board down to (preglass measurements) 6'1” tall, the width running 14 3/4” (one foot from nose)—20” (at widest)—14 1/8” (one foot up from tail), with a deep 6” swallow tail. Cutting a solid 6” off the nose, the rocker was reduced to 3 3/8” at the nose, with the tail kicking at 2 3/16”. The thickness, after all was planed and shaped, wound up being 2 1/2”—down from 2 3/4”.

For this board I wanted to experiment with a few design features. I am taking some design cues from surf legend Tom Wegener's Seaglass Project with the bottom of the board. The Seaglass is a revival of the Alaia, Hawaii's original surfboards, with some tweeks: they have no skegs (like the Alaia), but the rails are squared and the bottom has a concave groove running through the tail making them incredible riding boards for small waves. With no fins, the board is a little loose, but the concave groove gives the board some stability while the rails suck water under, propelling it like a rocket. You have to get low on the board, and position a lot of weight on the back, but the speed and surprising control are unique and the ride is like nothing else.
Tracing out the retro Twin Fin with deep swallow tail.
For the fish, I am sticking with fins (I am no Tom Wegener), but adding the concave tail, starting a third of the way down, though not as deep as the Seaglass (only about 3/4” deep—I am loosing buoyancy but the speed will make up for it), and I am hardening the rails at the tail, giving them a sharper, more squared shape. I want to see if I can gain some speed while keeping the classic feel, shape and rideability of the fish. I am also running the fins parallel to each other, versus the slight angle of fins found on boards today. The theory is that the concave shape will add to control, the reduced drag of the parallel twins will help with speed, and the deep swallow tail will keep it loose for agility.
 
For glass, I am going with 4oz. S-glass; single layer on the bottom and doubling it up on top. I am also going with Epoxy resin, adding strength and durability to the overall board, while reducing weight from the standard polyester resin of DIY projects. To help with the glassing and epoxy/composite work, I am calling on veteran Catamaran Designer and Master Boat Builder Michael Bell of Offshore Catamarans to help with ratios, technique and any sage advice he might have to offer on hydrodynamics, buoyancy and the chemistry behind the process .

We'll see how the design tweaks work; they may be a bust, but nonetheless, it should be a fun project and I'll keep you folks updated as I move along with the Retro Twin Fin Fish. Keep it classy and enjoy the Shore Life!

Tuesday, February 28, 2012

Less Than Jake headlines Spring Jam at Seabreeze Amphitheater

When I was wee lad growing up in the late 90s, the coolest band this side of the Mississip was Gainesville’s own Less Than Jake (LTJ). The upbeat ska band came out with two-minute song after two-minute song, burning my Discman to the ground. I probably saw this damn band 15 times; luckily West Palm and Ft. Lauderdale sit conveniently along the I-95/Fla Turnpike corridor; shit, they kick-started my love affair with PEZ Candy. Sixteen years later (for me; LTJ is celebrating their 20th birthday this year), LTJ is still scratching those same static ska chords and blowing them horns—wonder how the old dude, Howie J. Reynolds, is doing?


They may be a bit wider, a tad slower, and relying on some ‘classics’ but LTJ is back in SoFlo headlining Spring Jam, put on by Music Jam Productions, over at the coolest damn concert venue in this whole damn town, the Seabreeze Amphitheater at Carlin Park. From 10 a.m. to 10 p.m., Seabreeze is celebrating the, ahem, warmer months with 12 hours of tunes, eats, booze and, err, art. Plenty of local acts are getting in on the good times, including perhaps the freshest local band The Kinected; surf bums William Kimball and Hit Show; PBC reggae mainstays The Resolvers—boo-yah-ka-sha; the rocksteady/reggae fellas from PSL, RustiCo Drop; and a slew of others (South Side Dub, Honey Henny Lime, Spred the Dub, Bryan Matthew and the L.O.C., Crazy Fingers, We Kill Giants, All The Pretty Cars, Saltwater Grass and Scalawag).


Tix for this 12-hour music fest cost $20 before March 1 at Music Jam Productions website—hit this link—and a bevy of brick and mortars (below). Tickets are $30 a pop come March 1 and at the gate. Get the tix early folks; though the venue is outdoors, there is a capacity.

(Tickets available at the following: Jupiter: Corners Ocean Bar & Grill, Blueline Stand Up Paddle Surf, Local Surf Shop, Wolfe Guitars, Jupiter Music; Wylder’s in Tequesta; Florida Paddleboards in Juno Beach; Maraist Law Firm in North Palm Beach; Stuart: Morning Glory Café, Surf Central, Surf Ratz, Earthtones; Ohana Surf on Hutchinson Island; and Nomad Surf Shop in Boynton Beach)
Courtesy of Music Jam Productions


Seabreeze Amphitheater
750 S. A1A
Jupiter, FL  33477

Monday, February 20, 2012

Custom Handmade Skateboards, Part 3

Oak Short Board Skateboard

The skateboards I started as a weekend project last week are finally complete and if you ask me, look pretty rad. For paint jobs I went pretty simple. Once I sanded the boards down to 220, I went pretty minimalist on the oak, while I wanted to accentuate the shark on the poplar board. So though they are similar in size, they could not be more different in appearance.

On the red oak short board I wanted to let the natural wood shine, so made two simple green lines with watered down acrylic paint, no wider then the countersunk holes for the thru-bolts, and wrapped them around both top and bottom of the deck. I sanded the stripes down for a more distressed look, keeping with the 1970s vintage theme. 
Solid oak custom handmade skateboard.

I thought the grain of the wood was too pretty to cover with paint, decals or grip-tape, so I varnished the wood to let the grain and natural hue shine through. I was pretty liberal with the varnish, seeing that these are skateboards and, by design, take a beating. I used Varathane semi-gloss floor finish to protect the wood from scratches and wear because once it hardens, it is like steel. Wear a respirator when using this product, it contains heavy metals and is toxic.

Oak is really dense with heavy grain, and with the amount of shaping I did to give the nose and tail its shape, the grain really raised up when varnished, even though it was sanded down. So after two coats of varnish I busted out some 400 grit sandpaper and brought down the varnish nearly to the wood. Then I applied another two coats. Once those dried thoroughly, I took out some steel wool (4000 grit) to bring out a nice smooth texture. I applied another two coats of varnish, just for good measure, before adding some silica sand for grip on the top of the deck.

For this, I got some fine silica sand and put it in a salt shaker. I then put on a generous coat of Varathane and lightly sprinkled the sand onto the deck. This captured a fair amount of sand. Once dry, I added another three coats to ensure the sand was fully captured. This gives for a nice grip that allows the natural wood of the board come through versus covering the board in tape.

For hardware, I decided the Randal RII 180 were just a wee bit big, so I swapped them out and started working on a 40-inch pintail to fit the trucks (more on that to come!).

40-inch pintail in the works!

I picked up some 8-inch trucks (5 ¼ inch hangar) to bring the hardware down to size. I also picked up another soy product wheel—Sector 9 Soy-Based Biothanes, 65mm 78A—these so I can get a decent sampling of how Soy wheels stack up against the Sector 9 9 Balls on the Land Shark twin fin. I'll keep you posted on which works better, but from the few rides around the block I have gone on, they seem to ride pretty evenly, though the soy wheels feel a little softer.

I affixed the trucks on ¼ inch risers. When paired with the narrowed design of the board at the tail and nose, there was no need for wheel-wells.

The board rides smoothly and cuts sharp. It is a little heavier then the poplar board, but it hasn't offered any problems to me while cruising. Actually it seems to handle the uneven sidewalks a little better then the lighter boards I have ridden in the past.

Land Shark Swallowtail Poplar Skateboard

I really dig the little twin fin Land Shark I put together. The poplar has some great variation to the grain, ranging from blond to green to a deep purple, so I had to let that shine through on top and let the shark rein supreme down below.

To bring out the design, I used some stain (Bear semi-transparent Weatherproof Wood Stain in Gettysburg) to add some color to the body, and carry a 1-inch stripe along the top of the deck. So once the deck was completely shaped and sanded down to 220, fixed up any last needed repairs with the chisels on the shark design, I stained the board. I taped off a stripe that went the length of the top, and then taped off right at the shadow of the rail so the stain would not flare up to the top of the board. I started staining on the bottom first, then the top along the taped off line. The blue came out darker then I wanted on the bottom, so I sanded it down for a more aged patina, letting the grain peak through at spots. I left the strip up top bold and untouched. 
Poplar Land Shark Twin Fin Skateboard.

I then took some acrylic white paint and painted the teeth and the eye of the shark, two coats. Then dotted the eye with some black, and emboldened the teeth with some black lines, and a simple red line as a border. Once this was done, it was time to varnish.

After the first two coats, the poplar did not raise nearly as bad as the oak, so I sanded down with the steel wool. After that it was smooth sailing with the varnish, just as I did on the other board.

The end result is a pretty quick board with a lighthearted design that will mirror the twin fin surfboard I am shaping now.

Check back soon on updates on the wheel wear and if the soy product is really worth the buck, and on the progress on the pintail, it is going to be sick. And as always, enjoy the Shore Life!

Monday, February 13, 2012

Custom Handmade Skateboard, Part 2

Mapping deck shape and truck location.
I wound up making two skateboards, one out of a solid piece of poplar, with a design resembling a twin-fin surfboard, and the other out of a solid piece of red oak, a short board replica. After mapping out the deck and the truck location, I cut the deck out of the solid wood with a saw.

To drill the holes for the trucks, it is imperative to get a straight hole, so a drill press is key. Luckily we had a drill press and did not kill ourselves messing with it.

The only way to get the proper shape was to bust out the block plane to shape the rails, nose, tail and overall dynamics of the board, then sand the crap out of it until it is smooth, even and symmetrical. It takes quite a bit of time and an eye for it (as well as a couple other people's eyes to tell you when it looks like crap).

The shaping and sanding is time consuming, and could probably be done quicker with a palm router, but using a plane and sander gives it little extra character. Once shaped and sanded, the decks look mean and quick—straight up Dogtown and Z-Boys throwbacks, wooden hand-shaped bullets.

For the twin-fin, I got some inexpensive gear to test the board out. Using some Cargo 129mm trucks with Sector 9 'Nine Ball' 61mm/78A wheels and some Bones Reds bearings, I raised them up a 1/4” so the wheels would not rub the rails and I would not have to carve out wheel wells. The board is fast and maneuvers like a gem. Even though it is pint-sized, just under 30” long, the board can fly down the road and turns quite quickly.
Red oak shortboard up top, poplar twin-fin with the blue wheels.

I was a little worried that the poplar, a much lighter wood then oak would be a little weak and bend under the pressure of my 175lb frame, but it holds up perfectly. Word of advice, use soft risers versus hard. Since these decks are solid wood they do not flex like ply, so the squishy risers give just a little, keeping the ride smooth. I was afraid the board would ride like an old Jeep Wrangler with a suspension as stiff as a tractor, but these things are as sweet and soft as a marshmallow.

For the solid oak bullet, I went a little oversized for the gear, more for a fashion statement and an added bit of maneuverability. Slapping some Randal RII 180mm/50-degrees on a 1/2” riser, with some 70mm wheels and Sector 9 Platinum Abec 9 bearings (smooth sailing for $30, like the $100 Bones Swiss Ceramic bearings but a third of the cost), this board straight up flies. It looks like a surfboard monster truck, and as unstable as all hell, but don't judge a book by its cover. Once your on this thing and cruising, its all gravy; turns like a dream and rolls on for miles.

Jorge's board in the forefront.
My Colombian brotha Jorge over at RainySun Design came by this past weekend for a little woodshop class and made a fat popsicle of a board. Longer then the little minis, Jorge's board is also made out of solid red oat and sits around three-feet long. We slapped slightly larger Cargo trucks (149mm) with 1/2” risers on the deck to make up for the size difference. And with the Mother always on our minds here at Shore Life and Rainy Sun, Jorge went for the Dregs eco-savvy wheels, the Luv Yo Mutha 71mm made out of soy, eschewing the oil-based polyurethane wheels of old. (We'll keep you posted on how these bad boys hold up. This is a relatively new technology to skating, so the verdict is yet to be rendered, but if they burn out or hold up, we'll let you know.)

With the slightly larger deck and bigger set of hardware, the 'Bro-Sicle' handles much more like a traditional longboard skateboard without the major flex the ply-made boards usually undergo. This board is perfect for cruising A1A at Carlin Park.
Both the poplar twin-fin and oak shortboard, handmade skateboards.

These boards are unique, so if you are not wanting attention on a busy sidewalk or street, skate fast, because people will try to stop you to look at the goods. The next step is design. Still working with some different paints and varnishes, so we'll have to catch you later when the project is complete and have a full report.

Cheers and enjoy the Shore Life! 

Thursday, February 9, 2012

Handmade Skateboards, Part 1

Though the South Florida surf season is at it peak, the surf in 2012 has been iffy at best. So to ride out the lulls while keeping the ride perpetual, cruising along the beach road on a skateboard is a great way to keep the heart going, soak up a little Vitamin D and keep the seaward motion moving. But the boards found at the surf shops just don't suit my tastes; I don't want some super longboard or some street board, but a nice cruiser that's easy to maneuver and a little different from the standard stuff on the market. So the latest project at Shore Life is to make a handmade skateboard.

   The design of the board is relatively simple. I do not have access to a steaming setup, so I cannot bend wood, so it is time to get old school. These aren't those old crate scooters of old, but a page straight out of the 1970s when the Z-Boys were kicking it in Dogtown, and the decks were flat and fly. Using a solid block of wood, preferably oak, I hand cut the deck, modeling the shape after a twin-fin fish surfboard I am currently making (it is the surfboards little land brotha, and a future article), complete with a swallow tail and rounded nose. 
   
Truck location
   The dimensions are a closely guarded secret of the Shore Life brethren, but before cutting the deck shape I mapped out the position of the trucks. Being handmade, the shape will not be perfectly symmetrical, which adds to the character but doesn't make mapping out the position of the trucks post-cut easy, so placing the trucks while the board is still square was must.

   Once I cut the deck, I busted out the old block plane and Stanley Surform hand plane to cleanup the shape and get it looking like a deck.
  
   For a deck design I carved out a shark on the bottom using some super sharpened chisels and a Swiss-made wood-carving knife (don't try this at home folks, you'll cut your fingertips off or stick a chisel in your thigh).
   The rest of the setup must be done at the shop where the drill press is located, and since the weather calls for crap this weekend, check in this Sunday for the final product, a lineup of the hardware used and a review on whether the board is a boom or bust.


Cheers, and enjoy the Shore Life!

Tuesday, January 31, 2012

What's in a name?

In a word, everything. The name of the game is branding. A name is the first impression a company has with a potential costumer, buyer, reader, etc., so it should be something that helps convey the product while being professional and perhaps a bit clever.
    In our case, with Shore Life Florida, we hope to convey the message of the beach life and living the shore lifestyle; wherever water meets land in SoFlo, we hope to be there, showing the reader what makes this such a great place to live. With nearly 1,200 miles of shoreline (2,276 tidal shore and 663 miles of beaches), the Sunshine State is the most 'coastal' state in the lower 48, helping propel it as a the number one travel destination in the world (a record 76.8 million people visited the state in 2004). We believe Shore Life Florida is a succinct name for what we are trying to channel, so the next step is logo.
    When creating a logo for a brand, it should not be done haphazardly or half-cracked; this is, for the most part, the first thing people will notice of a company, and first impressions are key. For our logo we called on the dynamic duo at Rainy Sun Design, the same tandem working on the website design (more on that soon!) to come up with something that not only represents what we are attempting to do here at Shore Life, but represents the lifestyle as a whole. Founder and art director Jorge Marquez went about the design of the logo with a few factors in mind: It needs to be original; works with different media ( web, print, objects, and in different sizes); it needs to make an impression; and It's all about detail.
    The logo Jorge and Rainy Sun Design created takes on a vintage, late 70s, early 80s vibe; fluid and laid back. For a lot of people, Florida is nothing but stucco Mediterranean-esque strip malls and marbled accented grandeur. But for some, SoFlo is a laid back beach scene that has changed little from those early days in the 50s when Burt Reynolds was chucking footballs in Juno Beach and Double Roads was actually double roads. Shore Life aims to captures that sunshine vibe of no shoes, no shirt, no problem.  
    Jorge took this theme into consideration when coming up with the design: "To me, Shore Life means freedom, it is liberating and casual, full of life and a little bit of an adventure. I wanted the logo to mirror that, to show the fun, make it a little vintage and still show the life that the Shore Life can bring."
    The beauty of the design is that it uses clean lines to create a fresh, simple look, but is heavily detailed, giving the logo texture and an added dimension. "I wanted to create organic shapes for the design, so I started with the way an octopus moves, the way they look when they cross their arms," says Jorge. The logo embodies the round, swooping and curling motions of an octopus, intertwined and free flowing. "I didn't want straight corners, which are sharp, so I used subtle curved corners."
    In the end, Shore Life is a love letter to Florida and we hope that comes through in the logo and design. We grew up here, have seen the community take shape into the slice of paradise it has become (and swayed). South Florida is what drives this site, the landscape, seascape and the activities, so let us know what you think, keep us honest, and as always, enjoy the Shore Life!

Wednesday, January 11, 2012

Coffee Table Using an Old Surfboard and Bamboo


Coffee table using an old, busted surfboard and a few pieces of bamboo.
   Surfing is a great sport, becoming an outlet for stress, getting one in touch with nature and is a great workout. But, if you are like me and like to surf but are not very good, you have discovered how delicate a surfboard can be and have a garage full of busted, beat and broken boards. This leaves one with two options: toss'em, or get crafty and use them in some sort of art project. Here, I will show you how to make a simple coffee table using an old busted board, some bamboo and some machine screws.
For this table there is just a short list of components and tools needed:
Tools: drill, hacksaw or Japanese handsaw (Ryoba), drill bit (size for screw), screw driver, ratchet with socket (or adjustable wrench, whatever's handy), tape measure and level (if you're feeling froggy--the nice thing about the Shore Life is things are supposed to be relaxed and laid back, so a table that is not exactly plumb won't be a deal breaker).
Components for the table: surfboard, bamboo and some simple hardware.
Parts: surfboard (you'll want something intact, preferably without fins, and short-board is best, unless you want a monster buffet table), bamboo (4x22", 4x21", 2x72", 2x52", 2x18"), jute or sisal twine, 20 stainless steel (no rust) machine screws, washers and locking nuts (sizes will depend based on the diameter of the bamboo you are using. I used 2" and 3" screws, 10-32 size/thread, size 8 washers and lock nuts.
The Process
   The design for the table is simple, just a few sticks of bamboo securing the board. The board I used was a 6' Byrne with 19" middle, making the table, at its widest, 21", and stands 22" tall.
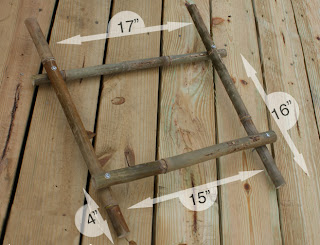
The leg setup with dimensions.
   I started building the leg setups first. The legs, 22" in length, will extend beyond the top of the board. I first attached the 18" bottom cross support, 4" from the base. I made a 15" spacing between the two legs. Once marking where the support should sit I drilled through both the support and leg together, thus ensuring the screw goes through easily (if you simply measure and drill the holes, they may not line up properly and make it difficult to pass the screw through). I then attached the bottom support, facing out, with 3" machine screws (the legs and supports were the thickest pieces of bamboo, so they needed the larger screws). Repeat with the other set of legs.
    I then affixed the support where the board will sit. I set these supports 16" high from the ground. For this support, I used a 21" piece of bamboo. I made the distance between the legs a bit larger at this support, 17" between, to accommodate for the board width (there will still be space between the legs and board). Once marked, drill like the previous support, though I attached this support facing toward the inside. (If the rocker is severe on the board you may want to drop the support an inch where the nose will sit to 15”).
Crossbeams on stabilize the table.
   Once both sets of legs have the supports securely attached, it is time to determine the distance between the two. I wanted the space between the two sets of legs to be about four-feet (letting the board extend by a foot on each end). To do so, I took two 52" pieces of bamboo and secured them to the bottom supports of the legs, alternating to the opposite leg, creating an ‘X’ on the inside of the table legs, alternating one end atop of the support, the other on the bottom. This will allow the beams to cross without getting in the others way. Secure with a machine screw at each end.
   Once these cross-sections are in, the table takes form, being able to stand on its own, though not fully secure. The table is secure in one direction but wants to collapse in the other. To keep the table from collapsing, I thatched the joints with some natural twine. Take some twine and wrap, affixing the leg to the crossbeam and support securely.
Thatching secures the joints.
   Now it is time to place the surfboard on the table. First clean it, getting any old wax off, then fit the board on the supports upside down (you can fit right side up if you wish), finding the proper placement. Now take the last two 21" supports and secure them atop of the board to the legs, facing out. I fit my mine snugly so the board would not move freely.
   Using bamboo, a knotty, bent wood, things won't be exactly even and plumb. So to remedy this and even things up a bit, I took two 70" pieces of bamboo to square the legs. Running them along the board, atop the crossbeam that supports the board, I secured the bamboo to the legs, forcing the legs to square up.
The finished product. Enjoy the Shore Life!
   The table is lightweight and perfect for the patio, porch or lanai. Careful not to overload the table or it could wrack. Good luck and write back if you have any questions. This is just a simple version I slapped together in a few hours; variations abound, so experiment and make it your own version of the Shore Life.
Up next: an Adirondack chair using a busted surfboard.

Sunday, January 1, 2012

Functional and cool surfboard rack


Simple bamboo surfboard rack
    Surfing has become a natural part of the South Florida landscape. Whether strapped atop car roofs, carried around the beach, acting as kitsch decor at high-dollar weddings and Palm Beach soirees, even adorning walls of beachy-themed restaurants and bars as a means of menu specials; simply put, surfing has infiltrated SoFlo's popular culture. And if you are like me and have been swept up in the free spirited dance on water, where swells dictate weekend plans, large infusions of income go toward surf trips and equipment, and the simple act of paddling takes on therapeutic qualities, then your quiver of boards has grown to incorporate all types of swells. Instead of relegating the boards to the garage, where they are subjected to all kinds of dings, bumps and dust, I prefer to keep my boards indoors in a safe and temperature controlled environment (surfing is an expensive hobby, I consider my boards an investment). But like many starting out in their young professional life, space is limited indoors, so incorporating my boards in a way that is versatile, visually stimulating and inexpensive became a personal mission.
Surfboard rack components
   What I came up with were simple bamboo racks that are minimalist and pretty cool looking that get the boards off the ground, incorporating them into the décor of the space while still being functional. Costing less then $10, each rack was built to size for each board using only three pieces of bamboo, inexpensive four-hole corner braces, a few screws and picture frame nails, and some hemp twine. For this example I'll use the rack I built for my 6'4" short board (and give the dimensions for my 9’2” longboard rack too). For bamboo, I harvested some from a neighbor who wanted to trim back their thicket. If buying bamboo, do not over pay; bamboo is a grass, it grows like a weed and needs to be harvested often to make for a manageable landscape feature. So if you can't harvest it yourself, checkout a local nursery, they usually have some harvested pieces for sale.
   I chose a 5' piece for the main crossbeam feature (8’ for the longboard), relatively thin but still had some meat to it, that way the board extended a few inches each side.
   For the main support of the rack, the points of contact for the board, I used two thicker pieces bamboo that came from the base of harvested pieces (about 1 3/8" to 1 1/2" in diameter), roughly 10" long. You can use the same piece of bamboo, as long as there are three segments, with three inches extending beyond the end segments. If doing this, the two support sections will differ in diameter, but minimally, about 1/8" to 1/4".
Bracket affixed to wall
   When cutting the supports, I took two pieces of bamboo with two segments and a few inches beyond both directions, one for each support. I first cut an inch past one segment (the narrower end). This will be the piece that faces out so you'll want to make sure to cut cleanly and do not fray the bamboo. I then measured 10” from this fresh cut and marked it. Once ensuring this part is a hollow segment, cut. This will be where the corner brace is inserted.
   Depending on how thick the walls of the bamboo are will determine how difficult a time you will have inserting the corner braces. If the walls are thick, the corner braces will have to be hammered into the bamboo. Center the corner brace in the bamboo right atop the opening. Hopefully there will only be a few millimeters of bamboo the corner brace needs to pass through. Holding the bamboo on end with the corner brace end facing up, hammer away until the angle of the corner brace fits flush with the bamboo. It may take a bit, but try not to bend the brace less than the 90 degrees. (If the bamboo walls are thin, as will probably be the case for a longboard rack, the bamboo will have a large opening and the corner brace will fit loosely, so you will need to secure the bamboo to the corner braces with screws, but this is done best once the corner braces are secured to the wall.)
   Once the corner braces are secure within the bamboo, it is time to secure the brackets to the wall. Find a height that suits your needs--the top of the brackets are essentially where the base of the board sits. Once the height is determined, affix the brackets. For the 6'4" board I spaced them 4' apart, giving the 5' bamboo section a few inches on each side (for the 9'2" longboard I spaced the brackets 6'--with an 84" cross section). Once the brackets are secure, push up on the bamboo so it extends the corner braces to roughly a 110-degree angel.
Small nail to secure crossbeam in place.
   If the bamboo still needs to be affixed to the corner brace, push up on the braces to 110-degrees. Measure from the wall to the two holes. Mark those measurements on the bamboo and drill two holes. Place the bamboo back on the brace and insert two nails or screws long enough so that they will not fall out. The weight of the surfboard and the nails will keep the bamboo from pulling out.
Crossbeam and support secured.
   Now that the bamboo is affixed to the wall, it is time to attach the crossbeam. This is for support, keeping the board from slipping out at the base and for aesthetics. To attach the crossbeam, I took a small nail, about an inch long and very narrow in diameter. Drill a very small divot into the bamboo attached to the bracket where you want the thatching to happen. For mine, I went 1 1/2" in from the end, just before the segment (for the longboard I went 2" in, just after the segment). Take the same drill bit and drill a hole 6" from each end of the crossbeam through both walls (I went 12" in from the ends on the longboard rack). Insert the nail and place the crossbeams onto the nails. This should give a loose hold. Now wrap the hemp twine over and over, securing the crossbeam to the bamboo supports. To cover the brackets on the wall, spilt a 3” to 4" segment of bamboo in half lengthwise and glue onto the exposed corner brace. 

   Now, simply place the board onto the rack, fins out, evenly on the two bamboo supports and lean against the wall. The crossbeam will keep the board from falling off. The rack will give a little, so do not overload; the weight of one board is a perfect fit.
The finished product. Simple, easy, distinctively Shore Life.